Monthly Archives: December 2015

Related Questions Grow +500% in 5 Months

Posted by Dr-Pete

Earlier this year, Google rolled out the Related Questions feature (AKA “People Also Ask”). If you haven’t seen them yet, related questions appear in an expandable box, mixed in with organic results. Here’s an example from a search for “Samsung Galaxy S6”:

If you click on any question, it expands into something that looks like a Featured Snippet:

Currently, Related Questions can occur in packs of between 1–4 questions and answers. Here’s an example of a box with only one question, on a search for “lederhosen”:

Once expanded, a typical answer contains a machine-generated snippet, a link to the source website, and a link to the Google search for the question.

How common are related questions?

We started tracking Related Questions in late July on the MozCast 10K, where they originally appeared on roughly 1.3% of queries. Keep in mind that the MozCast set tends toward commercial queries, and the absolute percentage may not represent the entire web. What’s interesting, though, is what happened after that. Here’s a graph of Related Questions prevalence since the end of July:

You can clearly see two spikes in the graph — one measured on October 27th, and one on December 1st. As of this writing (December 10th), Related Questions appeared on about 8.1% of the queries we track. In less than 5 months, Related Questions have increased 501%. This is a much faster adoption rate than other Knowledge Graph features.

Where do the answers come from?

When you expand a question, the answer looks a lot like another recent Knowledge Graph addition — Featured Snippets. Digging deeper, though, it appears that the connection is indirect at best. For example, here’s an expanded question on a search for “monopoly”:

If you click on that search, though, you get a SERP with the following Featured Snippet:

It’s interesting to note that both answers come from Investopedia, but Google is taking completely different text from two different URLs on the same site. With Featured Snippets, we know that the answer currently has to come from a site already ranking on page one, but with Related Questions, there’s no clear connection to organic results. These answers don’t seem tied to their respective SERPs.

Where do the questions come from?

It’s clear that both the answers in Related Questions and the snippets in Featured Snippets are machine-generated. Google is expanding the capabilities of the Knowledge Graph by extracting answers directly from the index. What may not be as clear, at first glance, is that machines are also generating the questions themselves. Look at the following example, from a search for “grammar check”:

Out of context, the question doesn’t even make sense. Expanded, you can see that it relates to a very specific grammar question posted on Quora. While the topic is relevant, no human would attach this question, as worded, to this search. Consider another example, for “cover letter examples”:

The first and last question are obviously, to a human, redundant. To a machine, though, they would look unique. To be fair, Google has come a long way in a short time — even a couple of months ago, some of these questions were riddled with grammar and spelling errors. As of this writing, I can’t find a single example of either.

Finally, there are the questions that no human would ever ask:

No rational human would ever want to know what kind of meat is in a gyro. It’s better that way.

What’s coming next?

It’s clear that Google is rapidly expanding their capability to generate questions and answers from the index. Both Featured Snippets and Related Questions have evolved considerably since their respective launches, and Google’s ability to understand natural language queries and semantic data is growing daily. It may be months before we fully understand if and how these results cannibalize organic clicks, but it seems very clear that Google no longer considers these features to be experimental and will be aggressively pushing forward question-and-answer style SERPs in the near future.

Sign up for The Moz Top 10, a semimonthly mailer updating you on the top ten hottest pieces of SEO news, tips, and rad links uncovered by the Moz team. Think of it as your exclusive digest of stuff you don’t have time to hunt down but want to read!

How to Add Beautiful Mobile App Badges in WordPress

Do you want to create a mobile apps review blog using WordPress? Mobile app review sites not only help users find apps, but you can also make money out of them by signing up as an affiliate to paid apps. In this article, we will show you how to add beautiful mobile app badges in WordPress with WP-AppBox.

Displaying mobile apps in WordPress with beautiful banners

First thing you need to do is install and activate the WP-AppBox plugin. Upon activation, you need to visit Settings » WP-AppBox page to configure the plugin.

Settings for WP-Appbox

WP-AppBox is a powerful plugin with lots of options. We will start by first visiting the settings tab. This is where all the general settings for the Appbox and the badges reside.

The default settings should work for most sites, but you can review and change them if you want.

Don’t forget to click on the save changes button to store your settings.

General settings for appbox and badges

If you want to make money as an affiliate, then you will need to click on affiliate IDs tab to enter your app store affiliate ID.

Currently the plugin supports Mac app store and Amazon Partnernet.

Adding your app store affiliate id

If you run a multi-author blog and want authors to use their own affiliate IDs, then you need to activate custom ID. Enabling custom ID will allow authors to visit their profile and add their own affiliate IDs if they want.

Allowing authors to add their own affiliate IDs

The next step is to choose which stores you want to use on your site. Simply click on the buttons tab and then select custom settings from button behavior drop down menu.

Select which stores you want to add

WP-AppBox supports these stores:

  • Google Play Apps
  • (Mac) App Store
  • Amazon Apps
  • Windows Store
  • WordPress
  • Steam
  • Chrome Web Store
  • Firefox Extensions
  • Firefox Marketplace
  • Good Old Games
  • Opera Add-ons

You can select which stores you want to be visible in the post editor. You can also show a button for each store or add these buttons under one WP-Appbox button.

Adding Apps in Your WordPress Posts and Pages

WP-Appbox makes it super easy to add apps into your posts and pages. Simply create a new post and you will notice the appbox buttons in the post editor.

Appbox buttons in WordPress visual post editor

Clicking on a button will add a simple shortcode to your post. For example, clicking on the play store button will add a shortcode like this:

[appbox googleplay ]

You will now need to visit the app store to locate the app you want to add. Copy the app ID from the address bar and add it into the shortcode like this:

[appbox googleplay com.gameloft.android.ANMP.GloftDMHM]

You can add multiple app badges to a post. Once you are done, simply save your post and preview it.

You will see the app information displayed in a beautiful app badge with a download link.

App badge showcasing an app from play store

Changing the App Badges Style and Appearance

WP-Appbox comes with different built-in styles for app badges. You can select the app badges by clicking on the App-Badge tab on the plugin’s settings page.

Choose a default badge style

You can choose different styles for different stores or choose a default style for all your app badges.

Alternatively, you can override this setting in the shortcode by adding the format “compact”, “Screenshots” and “screenshots-only” in the shortcode.

App banners in compact format

We hope this article helped you add beautiful mobile app badges in WordPress. You may also want to check out our guide on how to add post rating system in WordPress.

If you liked this article, then please subscribe to our YouTube Channel for WordPress video tutorials. You can also find us on Twitter and Facebook.

The post How to Add Beautiful Mobile App Badges in WordPress appeared first on WPBeginner.

How to Move Custom Domain Blogger Blog to WordPress

In our Blogger to WordPress migration tutorial, one of our readers asked us for the step by step guide on moving custom domain blogger website to WordPress. Blogger allows you to use 3rd party custom domains as well as Google domains with your blog. In this article, we will show you how to move custom domain blogger blog to WordPress.

Moving Blogger blog on custom domain to WordPress

Note: If you’re looking for moving a normal Blogger subdomain blog to WordPress, then see our guide on how to switch from Blogger to WordPress.

Only use this tutorial, if you are trying to move a Blogger site on a custom domain to WordPress.

Step 1: Getting Started

Before we start, it is important to note that this guide is for the self hosted WordPress blog. See our guide on the difference between self hosted WordPress.org site vs free WordPress.com blog.

In order to get started, you will need a WordPress hosting provider to setup your self hosted WordPress website. We recommend Bluehost because they are an officially recommended hosting provider of WordPress, and they will give WPBeginner users 50% off discount.

If you want a Bluehost alternative, then take a look at Siteground who also offer the same special offer to WPBeginner users.

Step 2: Change DNS Settings

Blogger allows you to use any domain name registered by a 3rd party. U.S. based users can also use a domain registered with Google Domains.

When you first setup the domain pointing to your Blogger blog, you were asked to add CNAME and A records to your domain’s DNS records. You will need to delete those records and add your WordPress host’s DNS settings.

You can get DNS settings required by your WordPress hosting provider from their documentation or support websites. A typical DNS nameserver looks something like this:

NS1.Bluehost.com

NS2.Bluehost.com

In this guide, we will show you how to update DNS settings in Godaddy. If you have registered your domain with some other registrar don’t worry. The basic settings are the same on all domain registrars.

Important: DNS changes may take anywhere between a few hours to one or even two days to fully propagate. During this time, you can access your Blogger blog by logging into your account.

Changing DNS Settings in GoDaddy

Log in to your Godaddy account and click on the manage button next to domains. Click on the gear icon next to your domain and then select manage DNS.

Launching DNS manager in GoDaddy

You will see your domain information page. Next, you need to click on the DNS Zone File. This is where all the DNS level records for your domain are stored.

Launch DNS Zone File in GoDaddy

On the DNS Zone File page, you need to locate the A record and CNAME aliases you added for your Blogger blog and delete them. Click on save changes button to apply your changes.

The next step is to setup nameservers for your WordPress hosting provider. Go back to manage DNS page for your domain and then click on manage under the namservers section.

Nameservers

On the next page you need to click on custom and then click on edit nameservers link to add your new WordPress hosts nameservers.

Edit nameservers

Click on the save button to make your DNS changes go live.

Step 3: Remove Redirect

Your Bloggger blog’s original blogspot.com address is redirecting users to your custom domain. Since we have changed the domain settings, we need to remove this from Blogger too.

Simply log into your Blogger account and go to Settings » Basic page. Under the publishing section, click on the cross icon to cancel the redirect.

Remove custom domain redirection from Blogger

Step 4: Install WordPress

If your domain’s DNS has propagated now, you can now install WordPress on your hosting provider.

If your domain is registered on a 3rd party service other than your web host, then you will need to add the hosting for the domain. For example, in BlueHost you will add your domain as an Addon domain through cPanel unless it is the main domain on your account.

After adding domain to your new host, the next step is to install WordPress. Follow the instructions in our complete WordPress installation tutorial.

After successful installation of WordPress on your custom domain, you will be ready to import content from your Blogger blog.

Step 5: Export Content From Blogger

Before you can import content into WordPress, first you need to export it from your Blogger blog.

Blogger allows you to export content in an XML file.

Login to your Blogger blog and visit Settings » Other page. Under the blog tools, click on the Export Blog link.

Exporting your Blogger blog

This will bring up a popup where you need to click on the Download Blog button.

Depending on the file size, it may take a few seconds or a few minutes. Once you have your data, it is time to import it into your WordPress site.

Step 6: Import Blogger Blog into WordPress

Login to your WordPress admin area and visit Tools » Import page. There you will see a list of importers for different services. You need to click on Blogger to install the Blogger importer.

Blogger import tool in WordPress

This will bring up a popup where you need to click on the Insall button. WordPress will now download and install the Blogger Importer plugin for you. Once it is finished installing the plugin, you need to click on Activate Plugin and Run Importer link to continue.

Run importer

On the Import Blogger screen, WordPress will ask you to upload the XML file. Simply click on choose file button and upload the XML file you downloaded earlier. Click on the Upload file and import button to continue.

Upload export file

WordPress will now import your blogger posts from blogger, once it is finished you will be asked to assign an author to the imported posts. You can assign your blogger posts to an existing author or create a new one.

Congratulations! you have successfully imported your Blogger blog into WordPress. However, you still need to make sure that you don’t loose any search rankings and that visitors to your old blog can easily land to the same content on your new WordPress powered website.

Step 7: Setup Permalinks

WordPress comes with a feature that allows you to set up SEO friendly URL structure. However, since you are importing content from Blogger, you would want your URL structure to be as close to your Blogger URL structure as possible. To set permalinks you need to go to Settings » Permalinks and paste this in the custom structure field:

/%year%/%monthnum%/%postname%.html

Changing permalink structure in WordPress

Setp 8: Setup Feed Redirects

You have successfully redirected your Blogger blog to WordPress. However, users who have subscribed to your Blogger RSS feed will stop receiving updates.

You need to redirect feed requests to your WordPress feeds. This can be easily achieved by editing .htaccess file in your WordPress site’s root folder. If you can’t find your .htaccess file, then see this tutorial.

Start by connecting to your WordPress site using an FTP client. You will need to enable ‘Show Hidden Files’ option in your FTP client settings. If you are using Filezilla, you will find this option under Server menu.

Show hidden files in Filezilla

Once you are connected to your website, you will find the .htaccess file in your WordPress site’s root directory. You need to edit this file and paste the following code before any other code in the file.

 <IfModule mod_rewrite.c> RewriteEngine on RewriteRule atom.xml /feed? [L,R=301] RewriteRule rss.xml /feed? [L,R=301] RewriteRule ^feeds/posts/?.*$ /feed? [L,R=301] RewriteRule ^feeds/comments/?.*$ /comments/feed? [L,R=301] </IfModule> 

Save your changes and upload the .htaccess file back to the server. Your Blogger feed subscribers will now be redirected to your WordPress site’s feed.

Customizing Your WordPress Site

WordPress comes thousands of beautiful themes and extremely powerful plugins.

See our guide on how to choose the perfect theme for your WordPress site. As for plugins, take a look at WPBeginner’s blueprint to find out the plugins and tools we use on this website.

As a new WordPress user you will often need help. WPBeginner is the largest WordPress resource site for beginners. See how you can make the most out of WPBeginner’s free resources.

We hope this article helped you move your custom domain blogger blog to WordPress. You may also want to see our list of 40 useful tools to manage and grow your WordPress blog.

If you liked this article, then please subscribe to our YouTube Channel for WordPress video tutorials. You can also find us on Twitter and Facebook.

The post How to Move Custom Domain Blogger Blog to WordPress appeared first on WPBeginner.

14 Amazing Social Media Customer Service Examples (And What You Can Learn From Them)

How important is customer service via social media?

According to J.D. Power, 67% of consumers have used a company’s social media channel for customer service.

And when they do, they expect a fast response. Research cited by Jay Baer tells us that 42% of consumers expect a response with 60 minutes.

So, how’s your social media customer service?

For this post I was excited to research a set of 14 amazing examples of customer service using social media.

Let’s get started!

pablo

1. Samsung: A Unicycling Kangaroo and a Dragon Phone

As a loyal Samsung customer, Canadian Shane Bennett asked for a free unit of their latest, soon-to-launch phone. To sweeten his offer, he included a drawing of a roaring dragon.

Not surprisingly, Samsung said “no”. But to say thanks, they sent him their drawing of a unicycle-riding kangaroo.

samsung-canada

Shane then shared both messages (and drawings) to Reddit where it went viral. In response, Samsung Canada sent him the phone he asked for – and customized it with his fire-breathing dragon artwork.

Samsung-canada-2

Takeaway: Have fun with customer interactions. Don’t take yourself too seriously.

2. Morton’s Steakhouse: Airport Delivery

While waiting for takeoff in Tampa, Florida, Peter Shankman jokingly asked Morton’s Steakhouse to deliver a porterhouse steak when he landed at Newark airport.

mortons

While departing the Newark airport to meet his driver, he was greeted by a Morton’s server with a 24 oz. Porterhouse steak, shrimp, potatoes, bread – the works. A full meal and no bill.

When you think of the logistics of pulling this off, it becomes even more impressive. The Community Manager needed to get approval and place the order. It needed to be prepared and then driven by the server to the airport, to the correct location and at the right time. All in less than three hours.

mortons-steakhouse

Some of the comments on Peter’s post suggest that this isn’t an anomaly. Another reader shares his experience of ordering a baked potato and getting a full steak meal – delivered and for free.

Takeaway: Do something unexpected for a loyal customer – when they want it most.

3. Gaylord Opryland: Sleep-Inducing Clock Radio

After numerous stays at Nashville’s Opryland Resort, Christina McMenemy wanted her own spa-sound clock radio that comes standard in each room. The sound helped her sleep better than ever, and she couldn’t find that model anywhere. So she asked the hotel for help finding it.

gaylord-hotels

Turns out, that model was exclusive to the Gaylord hotels. She thought that was the end of it, and went to her conference.

Upon returning to her room that evening, she found a gift waiting: the spa clock and a handwritten card. The staff had given her the product she was unable to find. Not only did they make a long term customer very happy, they also received significant media coverage for their act of kindness.

gaylord-hotels-2

Takeaway: Make customers happy one at a time.

A quick note on these first three examples

While it’s great to give away phones, steak dinners, and clock radios, this might not be sustainable customer service.

Why not? When other, loyal customers hear what these companies did, they might expect the same treatment. Can Morton’s deliver a free steak dinner to the airport for every customer who asks? Can Gaylord hotels give every loyal guest a free clock radio?

A more sustainable approach is to provide outstanding customer service on a daily basis. These next examples have lessons that can be implemented right away and on a consistent basis.

4. JetBlue: Feeling the Customer’s Pain

During a four-hour flight, Esaí Vélez’s seatback TV gave him nothing but static – while the rest of the passengers had normally functioning screens. How did he respond? He tweeted a complaint to JetBlue. Nothing inflammatory, but he was clearly disappointed.

jetblue

How did JetBlue respond? While they could have made an excuse or even ignored his tweet, they didn’t. They took his side and empathized with him.

“Oh no! That’s not what we like to hear! Are all the TVs out on the plane or is it just yours?”

After he confirms that it was just his TV that was out, they respond:

“We always hate it when that happens. Send us a DM with your confirmation code to get you a credit for the non-working TV.”

Not only do they imagine his frustration, but they also offer him a credit for his trouble.

What was the result? Just 23 minutes after his complaint, he tweets: “One of the fastest and better Customer Service: @JetBlue! Thanks and Happy Thanksgiving”

jetblue2

Takeaway: Put yourself in your customer’s shoes when responding to complaints.

5. Delta Hotels: Room With an Ugly View

While attending the #PSEWEB conference in Vancouver, Mike McCready tweeted that, while he liked his room at the Delta, the view wasn’t so nice. He didn’t tag the hotel, and he wasn’t asking for anything.

Within an hour, Delta responded – offering a room with a better view. And when Mike returned to his room after the conference, he found a dish of sweets and a handwritten card from the staff at his hotel. It made such an impact that he wrote a post about it – the very same day.

Screen Shot 2015-12-29 at 10.43.44

Takeaway: Set up a social listening strategy to listen to all customer conversations.

6. Waterstones: Man Locked in London Bookstore

While every customer comment is important, some are going to be a little more urgent than others. Like locking a customer in your store.

This happened to David Willis last year at Waterstones Trafalgar Square store. He tweeted:

waterstones

Not surprisingly, this tweet went viral, with 16,000+ retweets and 12,000+ likes. Because someone was monitoring Waterstones Twitter account, they were able to tweet 80 minutes later that they had freed their previously captive customer. Imagine how this could have turned out, if Waterstones customer service had stopped listening for the day.

waterstones2

Takeaway: Always listen to customer conversations.

7. Contextly: Customer Onboarding

Before I do business with a new company, I like to see if anyone is listening. It gives me confidence that they’ll be there if I have a problem or question.

When I was looking for a premium related-content service, I signed up for a free trial account with Contextly. The process was smooth, and I was excited about the app, so I tweeted about it. They responded with a positive, helpful tweet.

contextly

As a result, I’m confident that they are interested in me and will help me if I have a question with the app.

Takeaway: Use social media to streamline customer onboarding.

8. Xbox Support: Elite Tweet Fleet

Back in 2010, Xbox added a dedicated Twitter account. Since then, their Elite Tweet Fleet has posted more than two million support tweets. In fact, when I visited their account page, they were averaging two tweets per minute! And they have a team of 27 support experts.

Screen Shot 2015-12-29 at 11.57.41

Any company that assigns a dedicated Twitter account (and 27 people to manage it) is amazing to me. Check out some of their interactions:

Takeaway: Be committed to your social media customer service.

9. Nike: Respond Kindly to Confused Customers

Nike Support is one of the strongest customer service accounts on Twitter. They feature a dedicated Twitter account, support seven days a week and in seven languages (English, Spanish, French, Dutch, Italian, German & Japanese.)

An example of their approach is here in this customer interaction: A customer contacts them to ask for help finding an order number. Although the question was unclear Nike’s customer support made the customer feel cared for. And when the customer realized they had the information all along, their response is super supportive.

Screen Shot 2015-12-29 at 11.05.28

Takeaway: Be kind, even when it’s not your fault.

10. Seamless: Pay Attention to Every Comment

Seamless is an online service for ordering food from local restaurants. Food orders are full of variables and when you add in time frame and delivery – it has the potential to be a nightmare. To manage customer service, they have an active Twitter account where customers can share their love and voice their complaints.

In a recent comment, a customer tells Seamless that on his recent order he received white rice, instead of brown. He wasn’t upset – he said: “Don’t mind terribly, just FYI.”

Screen Shot 2015-12-29 at 11.07.04

In response, Seamless asks for the order number so they can check into it. In response, the customer tweets:

Screen Shot 2015-12-29 at 11.07.21

Takeaway: Pay attention to all customer service issues. Passive complaints that are left unaddressed can easily cause a rift between the vendor and customer.

11. My Starbucks Idea: Listen and Harvest Ideas

As a way to listen to customers – and get tons of great new ideas – Starbucks created My Starbucks Idea. To date, customers have submitted more than 210,000 unique ideas. To support this program, they have a dedicated Twitter account. It is a great place for users to share their observations and coffee wishes.

A couple of the recent ideas include solar cell equipped umbrellas for device charging and morning coffee delivery (looks like it’s going to happen).

Screen Shot 2015-12-29 at 11.09.48

Takeaway: Make it easy for customers to tell you what they want. Listen to everyone and implement the winning ideas.

12. Sainsburys: Fishy Exchange

Sainsbury’s is one of the largest supermarkets in the UK. They’ve got a pretty active Twitter feed with lots of customer questions about products and sale prices. The tone of the account is helpful and positive.

There are lots of good examples of interactions. But none better than Fishy Sainsburys. This fishy exchange took place over a three hour period, between David (Sainsbury’s Twitter manager) and Marty (a customer). The puns will make you groan – many made me laugh out loud. Remember, this interaction was not a marketing play but a real conversation between the company and a customer.

Screen Shot 2015-12-29 at 11.11.08

Takeaway: Let your customer service team have fun.

13. Hubspot: Every Day of the Year

Holidays can be challenging times for customer service. When customer service closes for the observance of a holiday in one country, users from other countries will still have questions.

This recently happened with a HubSpot customer in London. She had workflow issues and couldn’t contact anyone at the US-based call center because it was closed for American Thanksgiving. When she took her concern to Twitter, she found a customer service representative in Ireland.

Screen Shot 2015-12-29 at 11.31.51

Like many companies in this list, HubSpot has a dedicated customer service Twitter account. To manage international schedules and time zones, they have two Dublin-based representatives and another three in Cambridge, MA.

Takeaway: Be available for your customers.

14. Buffer: Personal and Kind

If you take a quick look at Buffer’s Tweets & replies feed you’ll see how engaging their customer service is. Responses are personal and friendly. And they are usually signed by the team member you’re chatting with.

Screen Shot 2015-12-29 at 11.32.59

For example, my wife has been impressed that when she mentions them in a tweet, they acknowledge it, even using her name in their response.

Takeaway: Treat each person with respect. Use your name (and theirs) when interacting with customers online.

What we can learn from these customer service examples

Here are some key takeaways:

  1. Choose a primary channel for customer service (many use Twitter) and assign staff to manage it.
  2. Decide on your schedule of availability (set hours and days) and post it on your profile.
  3. Have each tweet/post signed by the person who sent it. This is done well by Xbox Support, Sainsbury’s, and Buffer.
  4. Remember that customers might contact you any number of ways – not necessarily on the channel you chose. Make sure you monitor other social channels for questions and conversations about your brand.
  5. Establish a tone for your social media conversations. Generally speaking, you’ll want first to empathize with your customers problem. Stephen Covey said it best: “Seek first to understand…”

I recommend following a few of these companies on Twitter. Watch how they handle customer complaints and comments. I’ve learned so much doing this.

What to do next: Review these points with your customer service team. Decide which apply to your business right now and assign a team member to implement them.

Over to you

Have you had an amazing customer service experience via social media? How are you using social media to provide customer service? I would love to hear both in the comments!

The post 14 Amazing Social Media Customer Service Examples (And What You Can Learn From Them) appeared first on Social.

How [and Why] to Build a Booming Facebook Group

Posted by ryanwashere

Over the last 2 months, I’ve driven well over 6,000 organic Facebook visits to my site.

Facebook Traffic

It’s not coming from a Facebook Page; it’s coming from a Facebook Group.

Several months ago I started my own Group, Digital Marketing Questions — this week we hit 3,000 active, engaged, spam-free members.

Screen Shot 2015-11-15 at 12.41.53 PM

In this post, I’m going to retrace my steps and tell you exactly how to build your own Facebook Group.

What are the benefits of building a Facebook Group?

Before I tell you how to build one, I quickly need to talk about why you should build one.

Facebook might not be “cool,” but it’s crazy effective

All the kids left Facebook years ago for Instagram (now Snapchat) and a number of businesses gave up on Facebook marketing efforts when “organic reach” plummeted.

Despite this, there are still hundreds of millions of users still on Facebook.

In fact, Mark Zuckerberg posted a status a couple of months ago stating that for the first time in the network’s history, Facebook had over 1 billion active users in a single day.

Let that marinate for a second.

Facebook is a powerhouse that isn’t going anywhere anytime soon — it’s time to re-invest back into the network.

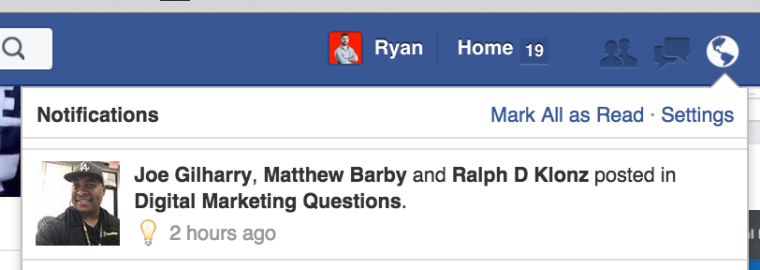
Group updates send notifications to members

Facebook pages and personal posts rely completely on the Newsfeed algorithm for organic exposure. Facebook Groups send users a notification whenever someone posts to the Group, thus driving traffic to each post.

Screen Shot 2015-10-15 at 8.31.57 PM

On mobile as well:

IMG_1055

Facebook gives users the option to silence these notifications. However, if your Group consistently adds value, they won’t.

Groups have more organic “reach” than Pages

A while back I ran a test:

  • My page had 660 likes; My Group had 660 members
  • I took a link from my blog and tagged it with 2 different CIDs in the URL Builder
  • I called tagged the first URL as “Group Test” and the second as “Page Test”
  • I took both appended URLs and posted “Group Test” to my Group and “Page Test” to my Page at the exact same time
  • Results: Group = 122 visits, Page = 8 visits
  • That’s over 15 times the traffic!

Facebook Group Reach

Owning a quality Group is a bargaining chip

Let’s piggyback off the previous point for a second.

  • When the Group had 660 members, we were driving 122 visits per post = 18% visit rate (CTR)
  • A recent post when the Group had 2,700 members drove 600 visits = 22% visit rate (CTR)

With the ability to drive quality traffic with a single post, you’ve got a powerful value proposition. I do a ton of link outreach for clients — including the Group in my pitch has skyrocketed success rate.

I mean, which outreach email would you respond to?

Outreach email 1:

Hey [Editor’s name],

I came across your post [insert URL] and really enjoyed it. I noticed you’re linking out to some posts about [insert topic] and wanted to pitch you on my latest guide that fits in perfectly.

If interested, let me know and I can send you the URL to check out for yourself.

Outreach email 2:

Hey [Editor’s name],

I came across your post [insert URL] and really enjoyed it. I noticed you’re linking out to some posts about [insert topic] and wanted to pitch you on my latest guide that fits in perfectly.

If included, I’d be happy to share it with my active Facebook Group [insert link] that regularly drives over 600 visits every time I post.

Link building (and marketing, really) is about the exchange of value. When you’ve got a solid value proposition in exchange for the link, your acceptance rate goes through the roof.

Can you say… free content?!

Despite the lack of organic reach, Facebook Pages are still a tremendous marketing resource. However, you need invest time into creating content to be successful. This is a full-time job in itself which requires you (or someone else) to spend time managing it.

When properly managed, Facebook Groups run themselves because the content is crowd sourced from members.

All you need to do is stay active on threads and make sure you’re keeping a close eye on spam.

How to build your own active Facebook Group

Hopefully I’ve convinced you about the benefits of building a quality Group. Now, let’s talk about the how…

Step 1 – Create a Group

I’m not going to go into detail on how to create your Group because it’s easier than setting up a Facebook Page.

Screen Shot 2015-10-15 at 9.30.24 PM

I do want to talk about creating the context of your Group. In other words, what should your Group be about?

Unless you’re a brand, don’t make it about you.

Shopify has a number of helpful Groups geared towards customer support, marketing, general tips, etc. They’re able to build communities based on their brand.

Screen Shot 2015-10-16 at 9.56.54 AM

For those of us who aren’t brands, we don’t have that luxury.

In the grand scheme of things, I’m a nobody. If I would’ve made my Group “Ryan Stewart’s Digital Mastermind”, I wouldn’t be writing this article right now because nobody would’ve joined.

Focus the context of your Group on the value it provides to members. I like to approach it like I would content strategy:

  • If you own a coupon website, create a Group focused on exchanging couponing tips
  • If you own a local bakery, create a Group about recipes, holiday treats, etc.
  • If you own an oil-changing business, create a Group for motorheads

Facebook Groups shouldn’t be approached with a conversion or direct marketing mindset. They work best when approached as a branding tool.

If you can create a valuable resource, your brand will grow with the Group by association.

Step 2 – Keep your Group active

Remember, Groups are communities—they need to be focused on what engages members. That means hold off on promoting yourself, your business, and links until you’ve earned the Group’s trust.

How do you build trust? By delivering value.

Create native content for the Group

Some Facebook groups are just a feed of links to the admin’s blog articles.

Don’t do that.

Instead, create native content specifically for the group. Keep ALL the content and engagement within the Group, instead of trying to drive them to your latest post.

In fact, I went a full month without posting a link directly to my site.

Things to try:

  • Polls
  • Images
  • Native video uploads

Make it obvious you’re there to help them.

Screen Shot 2015-11-13 at 11.31.18 PM

Do this well and when you do post a link to blog/promotion, people will trust you enough to click it.

Step 3 – Promote your Group

A Facebook Group can grow much faster than a Facebook Page (my Group grows 20x times faster than my Page). However, they don’t grow on autopilot. They need a significant investment of time, energy, and resources to drive members.

The key to growing a Group (or anything, really) is making it a priority. If you foresee value in owning a Group, take it seriously by investing the necessary resources into growth.

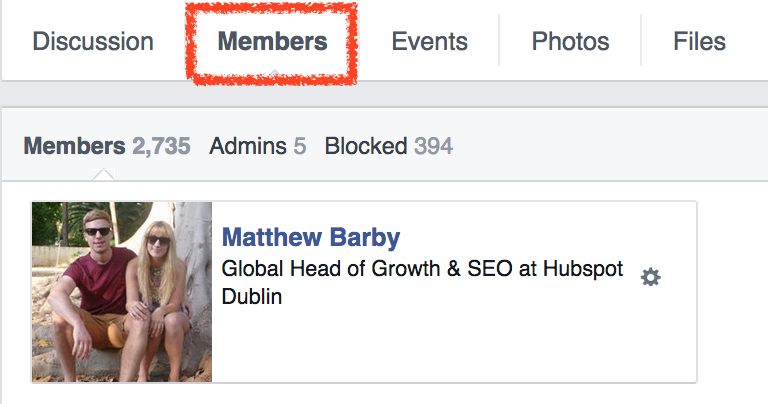
Get influential people to join

First, let me say this…

DO NOT add people to the Group without their permission.

Screen Shot 2015-10-15 at 8.17.41 PM

2 reasons:

  1. It’s annoying.
  2. Facebook’s algorithm is heavily based on engagement. If you add people who don’t want to be there, they won’t participate. If they don’t participate, your Group’s content will get poor engagement, i.e. poor visibility.

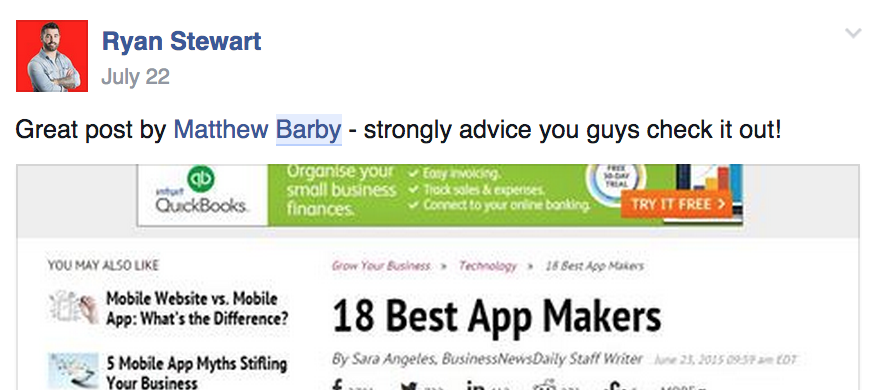
Instead, target influencers in their space and share their content.

Screen Shot 2015-10-16 at 9.49.18 AM

Tag them in the post so they know you shared it.

Screen Shot 2015-10-16 at 10.09.04 AM

They’ll most likely join the Group on their own. This is a huge bonus for Group members and incentive for more to join.

Promote the Group on your site

You’ve got your Facebook Page on your website, right? Why not add (or replace) this with a link to your Facebook Group?

If your website does significant traffic, this is a great way to grow your Group.

Private Group Screenshot

Data shows the standard logos in the header attract little to no attention. Instead, I added a link to my Group in the bottom right-hand corner of my footer and tagged the link with a tracking CID.

Over 3 months, it drove 346 clicks. Not a massive amount, but every little bit helps.

Create “gated content” to entice people to join

It’s not uncommon to create a great piece of content to entice email opt ins (aka “gated content”). Instead of asking for emails, you can drive people to your Facebook group.

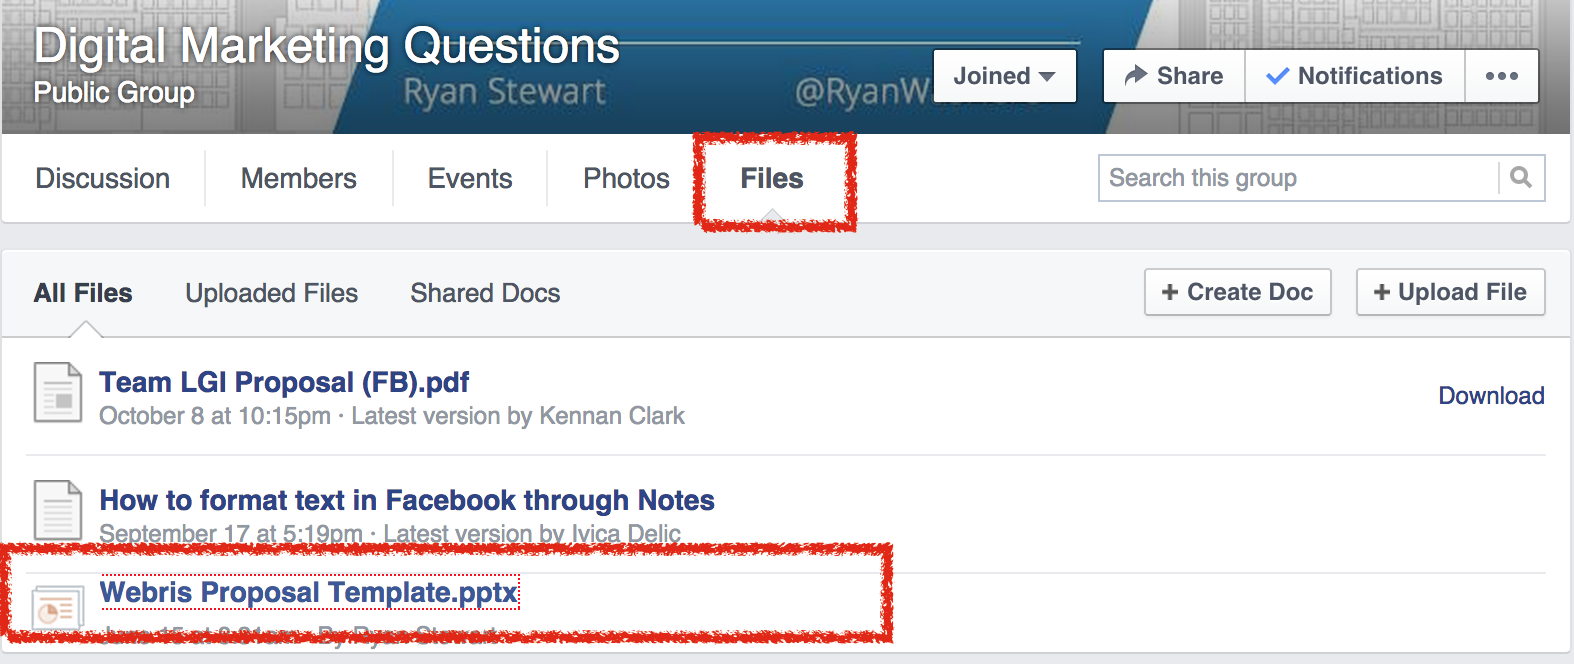
For example, I wrote a post about how to create an SEO proposal. I also took the time to create a free proposal template for visitors to download for their own use.

Screen Shot 2015-11-13 at 11.36.06 PM

I hosted the proposal template within the “Files” section of the Group.

Screen Shot 2015-11-15 at 12.40.58 PM

To download it, they had to join the Group. Of course, just creating content isn’t enough, we’ve got to promote it as well.

I chose to use organic channels like Inbound.org, GrowthHackers, Warrior Forum, and a few others.Screen Shot 2015-11-20 at 7.01.53 AM

This was by far the most effective method I used, not only to gain members, but quality ones as well. Try and focus your promotion efforts in places where your target users are spending their time.

We want to focus more on building a quality, engaged member base as opposed to a massive, inactive one.

Facebook Ads are extremely effective

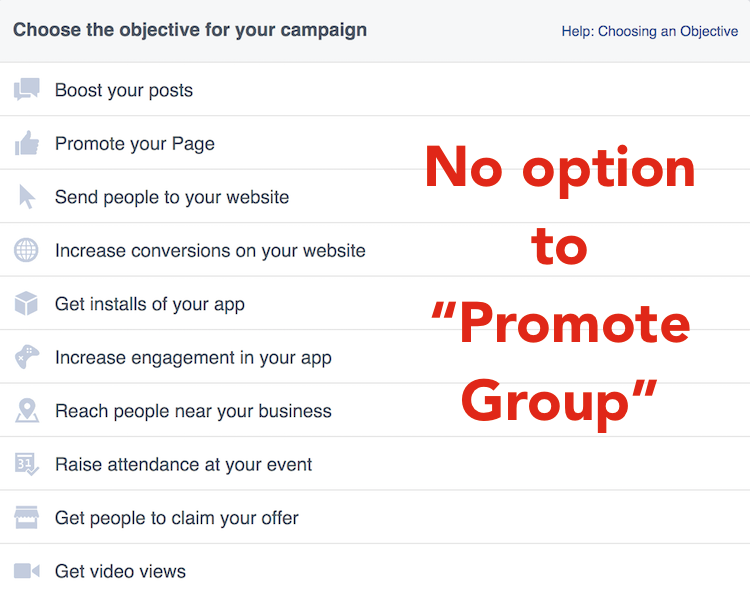
It took me some tinkering to figure out how to promote the Group with Facebook Ads.

You can’t promote a Facebook Group the way you can with a Page.

Screen Shot 2015-11-20 at 7.13.48 AM

Here’s how to get around it:

  1. Write a post on your Facebook Page and drop a link to the Group
  2. Create a new Ad, select “Boost your posts”
  3. Select the post with a link to your Facebook Group

Screen Shot 2015-11-15 at 1.45.30 PM

I started by targeting by remarketing list and then expanding to lookalike audiences after that was exhausted.

In honor of full transparency, exact results from the ads are difficult to track.

“Results” are calculated by post engagements, i.e. Page likes, comments, shares, etc. Not included in “results” are people who clicked through and joined the Group.

Screen Shot 2015-11-15 at 1.25.07 PM

From my own calculations, the Group grew 300 members during the 1 week we were boosting the post — that’s three times the organic growth rate.

Even though you can’t directly track new members with analytics, Facebook ads are no doubt a valuable promotion tool.

Drive [indirect] traffic to it

I write a lot of guest posts. Within my posts I often link to my personal website.

Screen Shot 2015-10-16 at 10.19.46 AM

That site has a big ol’ call to action to join the Facebook Group:

Screen Shot 2015-10-16 at 10.18.27 AM

This helps to strategically reach new audiences without directly promoting the group within the post.

You can also use guest posts to drive traffic to your post with “gated” content. Both tactics work well, but this one is slightly more direct.

Cross-promote with other Groups

If you’re consistently adding new members, you can pitch other Group admins to exchange cross promotion posts. I’ve had good success using Facebook’s internal search to find similar groups.

Screen Shot 2015-11-15 at 12.46.47 PM

It takes a while to find spam-free Groups, but once you do it’s just a matter of tracking down admins, adding them as friends, and sending them a quick pitch.

Screen Shot 2015-11-15 at 12.47.11 PM

If you’ve got a different audience base, you can add tremendous value to each other by exposing your Groups to new audiences.

Step 4 – Keep your Group spam-free

The biggest knock against Facebook Groups is spam. A Group can turn into a discount Ray Ban marketplace overnight if not carefully watched by the admins.

It’s your job to set and enforce the rules.

It starts with a strong Group description

Leave no room for guessing. If someone joins the Group and immediately promotes a link, they’re banned, no questions asked. It’s entirely too much work to give individual warnings to people.

Screen Shot 2015-11-18 at 4.27.07 PM

Encourage Group members to flag spam if they see it — stand firm on your no spam rule.

Remind members of the rules from time to time

Some people are in a lot of Facebook groups. They don’t always remember what they can or can’t do in each group.

If you get an uptick in spam in your group, post a reminder about the rules. This has the added benefit of pulling the group together, since the members genuinely want a spam-free place for questions and discussion.

I got tired of repeatedly posted warnings so I created a video and pinned it to the top of the Group. Since doing that, we’ve seen a significant drop in spam posts.

Screen Shot 2015-11-18 at 11.42.48 AM

Handle rules infractions via PM

Even established members of the group will occasionally break the rules. Usually it’s because they forgot or weren’t sure if something was okay to promote.

In those cases, delete the post, but also PM the offending member and let them know what happened.

Often the person will apologize and that’s all you’ll need to do. If they argue with you, just remember it’s your group, not theirs. You get to decide who stays and who goes.

Occasionally let people know when you ban someone

When you ban someone from the Group, it’s an opportunity to reinforce the pride people feel at being part of the “inner circle.”

They get to stay, because they followed the rules. The other people broke the rules, so they got banned.

This also reminds people to report spam or rules infractions when they see them.

Moderate disputes by PM

Sometimes a passionate discussion devolves into an ugly argument. When that happens, PM to the parties involved and let them know it’s not okay to have a big public fight in the Group.

Usually that will calm things down. If things got really nasty, you also have the option to just delete the entire thread.

Consider getting a full-time moderator

Finally, when your group gets big and active, you might not have time to properly moderate it.

That’s the time to hire a moderator. Often you can find someone who’s already active in the group, knows the rules and is willing to do it for free.

Bottom line — a Facebook Group can turn to spam quickly. Make sure you’re prepared to invest some resources to make sure it stays clean over time.

Conclusion

The numbers don’t lie — my Facebook Group is the strongest brand asset I have.

If you’re looking to build an active, engaged community around the problems your business solves, I strongly suggest you look into creating one of your own.

Sign up for The Moz Top 10, a semimonthly mailer updating you on the top ten hottest pieces of SEO news, tips, and rad links uncovered by the Moz team. Think of it as your exclusive digest of stuff you don’t have time to hunt down but want to read!

16 Sources for Free Public Domain and CC0-Licensed Images

Are you looking for free royalty free public domain and CC0-Licensed images for your blog? High quality images can boost the engagement level of your website. In this article, we will show you 16 great websites where you can find free public domain and CC0-Licensed images that you can use anywhere.

Best sources to find public domain and cc0 licensed images

Why Use Free Public Domain or CC0-Licensed Images?

All images on the web are protected by copyright. Even if the copyright is not mentioned, you should assume that they are. Using them without permission is illegal.

While you can buy high quality royalty-free images from stock photo websites like ShutterStock, not everyone has the budget to buy licensed photographs and images.

That’s when images with public domain and CC0 license comes in handy.

Public domain is the term used to describe works whose licenses have expired, or works that are explicitly released with no restriction on their usage.

CC0 is a license that allows copyright owners to release their works with no restrictions at all.

Images under public domain or CC0-License can be used by anyone for any purpose. As a website owner you can use these images in your blog posts, featured images, slider, image galleries, backgrounds, and basically anywhere else you want.

Having said that, let’s take a look at some of the best curated sources for free public domain or CC0-Licensed images.

1. Public Domain Archive

Public Domain Archive

A very well organized and large collection of public domain photographs. You can easily browse images filed under categories or use the search feature.

2. Unsplash

Unsplash

A very popular destination for high quality CC0 licensed photographs. The site releases 10 photos every 10 days. It has a nice search feature which you can use to find images matching certain themes like nature, office, work, etc.

3. Little Visuals

Little Visuals

Little Visuals is a beautiful curation of hundreds of hi-res stock photos that you can use on your website. It has a search feature that you can use to locate images, or you can also click on the tags below each image to find similar photographs.

4. Public Domain Pictures

Public Domain Pictures

Public Domain Pictures offers free high quality images, graphics, and vectors for downloads. Images are sorted into categories for easy browsing.

5. New Old Stock

New Old Stock

As the name suggests, this website features a beautiful collection of vintage photographs that are now in public domain.

6. Pixabay

Pixabay

Pixabay offers a large collection of free images. The site updated on a regular basis so you will find new and less used images there.

7. Pickup Image

Pickup Image

Pickup Image offers a huge collection of public domain images. The site can be easily browsed through tags or you can try the search. It also offers free clipart and graphics.

8. SplitShire

SplitShire

SplitShire is a beautiful collection of photographs by Daniel Nanescu released under CC0 license. You can browse the site by using tags filter, or view images in mosaic view.

9. The British Library

The flickr account of The British Library showcases over a million illustrations, drawings, and works taken from 17th, 18th, and 19th century books. All these works are released under CC0 license and can be used anywhere without restriction.

10. Magdeleine

Magdeleine

Magdeleine is a very easy to browse resource for free photographs. It offers both public domain and images that require attribution, so make sure that the image you are downloading is marked under public domain.

11. LibreShot

LibreShot

LibreShot features works of photographer Martin Vorel released under public domain.

12. PDPics

PDPics

An easy to browse collection of free public domain stock photos. PDPics has a large collection of thousands of public domain images that you can download and use in your blog posts.

13. Reusable Art

Reusable Art

Reusable art is a collection of more than 3000 vintage drawings, illustrations and artworks. All works displayed on the website are under public domain.

14. Skitterphoto

Skitterphoto

A beautifully curated collection of CC0 Licensed images. The site features works of theirs own photographers so you will find less used and unique photographs.

15. StockSnap.io

StockSnap.io

StockSnap is a curation of beautiful free stock photos where hundreds of images are added weekly.

16. Barn Images

Barn Images

Barn Images is a beautifully curated collection of CC0 Licensed images. You can browse images in categories or tags, or you can search for keywords. All images are available in high resolution for free downloads.

That’s all, we hope this article helped you find best sources for free public domain and CC0-Licensed images for your website. You may also want to see our guide on how to speed up WordPress by saving images optimized for web.

If you liked this article, then please subscribe to our YouTube Channel for WordPress video tutorials. You can also find us on Twitter and Facebook.

The post 16 Sources for Free Public Domain and CC0-Licensed Images appeared first on WPBeginner.

Case Study: How Switching Tools Increased Email Reply Rates by 187% in 1 Month

Posted by kelseyreaves

The link building world is in a constant state of evolution. New tools are continually introduced to the market, with SEOs ready to discover what works best. Our outreach team at Modernize recently found ourselves in this position. In need of a new email automation service, we were eager to explore and test out new tools to see what improved our overall outreach system.

Modernize is in the home improvement space, and we focus heavily on energy efficiency and green living — thus, we target lots of green blogs, solar websites, etc. Our aim at Modernize is to be a resource for homeowners and provide quality content so homeowners can make informed decisions when it comes any home improvement project.

When faced with this task of changing our email automation service, we were pleasantly surprised to come across a more effective tool. This recent switch drastically increased response rates and ultimately our number of attainable back links. In an effort to help other link builders increase reply rates, I wanted to detail our process of switching from Get Response to Pitchbox, and how we eventually increased our response rate by 187% in only one month’s time.

The original setup: Get Response and Infusionsoft

Our link building strategy has two main parts that work in conjunction to generate links: our initial outreach email sent via Get Response and our marketing automation built in Infusionsoft. Both parts are essential to our outreach strategy; however, with time we had realized Infusionsoft was working great, while Get Response was causing us some trouble.

To begin, we take the list of prospects we’ve assembled and upload them into Get Response. Next, we craft our initial outreach message using a Get Response template. Each email used similar messaging, although we swapped writing examples based on the vertical we sent to. For example, green websites would be sent samples of our content on “How to Save Energy at Home This Winter” and “Why Solar is Always a Good Investment.” Home decor bloggers were sent our sample content on “Trendspotting: Home Accents in Neon” and “Great Sources for Temporary Wallpaper.”

For each response, we’d create a record in Infusionsoft that contained their basic information, including their first name, the source, email, website name, Domain Authority, and Page Authority. We also place each contact within the appropriate status in the 10-point sales sequence we created.

Here’s each step in that sequence:

  1. Not Interested: The contact isn’t interested in having us contribute content.
  2. Interested: When an individual is interested in learning more about what we are doing. They may ask questions like “What’s in it for me?”, “What is in it for you?”, “Do we have to pay for content?”, etc.
  3. Negotiation: When they’re interested in hearing article topics. We usually pitch 2–3 article topics for them to choose from. We also leave the option open for them to suggest ideas to us.
  4. Article Requested: When we’ve agreed upon an article topic and it’s now time for our content team to write the article.
  5. Article Sent: The article is completed and sent out to be reviewed.
  6. Scheduled: Article is scheduled to go live.
  7. Won: The article is published and live on their website.
  8. Paid: There’s a fee for posting an article.
  9. Lost: If a contact had at one time expressed interest and was moved into the sales sequence, then changed their mind (ex. they did not like the article), we classify them as “lost.” The biggest reason for moving a contact to lost is that we simply never received a response back, even after a series of follow-up messages.
  10. TTYL: When the individual is interested but would like to discuss at a later date.

modernize example photo2.JPG

Example contact in Infusionsoft

modernizeexample3.JPG

Example contact placed into marketing automation within Infusionsoft

We place each record created in Infusionsoft within our marketing automation. If a prospect doesn’t respond within a week, they get an automated follow-up. The messaging varies dependent upon where they are in the sales sequence. Each stage has a series of 5 follow-up messages. If after 5 tries there’s still no response, we move the contact to “Lost.”

Infuionsoft.JPG

Snapshot of 2 stages of our sales sequence built in Infusionsoft

Problems we experienced with Get Response

As we standardized the process, it was clear that Get Response had drawbacks. With Get Response, you’re required to use one of the pre-made templates when sending out a bulk email. We tried to make the template look as “real” as possible. However, the best template we found offered a cupcake-yellow background and unusual centering. As one would expect, our initial email looked very spammy. Furthermore, the “From: 332015@getresponse.com” at the top was a dead giveaway that the email was automated.

Original Message.JPG

With this process, you cannot set up automatic follow-ups to those who do not respond or open the initial email. It’s essentially a one-and-done deal. Therefore, if a prospect didn’t respond to our initial email, we would have to manually export the list, craft a follow up template, and send an entirely new message. Needless to say, this was not a viable option for the volume we were striving to reach on a weekly basis.

Why we made the switch

When making the switch from Get Response, we had certain features we were in need of that the new tool we tried, Pitchbox, was able to fulfill. These included:

  • Follow-up messaging: After the initial email is sent, we wanted the ability to create two unique follow-up messages for those that that do not open the first email, second email, and so on.
  • Lots of personalization: The ability to personalize each email with website name, first name, etc. Pitchbox syncs each website with their Facebook and Twitter, giving us the option to quickly access their social media if we feel the need to mention their latest article or social media post within the outreach message.
  • Synced with Gmail: Our message will be sent through our own Gmail accounts; therefore, it’s a real email that doesn’t come off spammy.

Pitchbox2.JPG

Pitchbox templates, including the initial message and two follow-up messages

Setting up Pitchbox

Our first step when setting up Pitchbox was to connect our outreach email to the account. After we synced our account, we crafted the first outreach message. Minus a few changes in wording, we essentially used the same message in Pitchbox as we had used with Get Response. The pitch read:

secondmessage2.JPG

Over time, we tested different subject lines and discovered our highest-performing subject line was “quick question about: domain.com” that had an average open rate of 60.19% across all verticals.

Next, we went ahead and created the follow-up messages. We wanted the follow-up messages to look as realistic as possible, and therefore used the following message as our first follow-up. The idea was to make it seem like we were replying to the last message we sent them.

Here’s what the follow-up message looked like:

secondmessage3.JPG

The last follow-up message followed in the exact same form:

secondmessage4.JPG

We decided the optimal wait time between follow-up messages was 4 days. This gave us time both to respond to all emails and to follow up close enough to convey a sense of urgency.

Our next step was composing the outreach schedule. Pitchbox sends one email out every 3–4 minutes; with multiple campaigns running at once, it was essential to create an outreach schedule that could handle a large volume of emails. Therefore, our outreach schedule sends out emails every day of the week, 7am until 8pm specific to the recipient’s time zone. We also added another outreach email that helps to split up the volume of the emails.

Now we could send out two emails every 3-4 minutes, not just one. With Get Response, we did have the ability to send out emails all at once, therefore we could test different times of the day to see what works best. Since Pitchbox sends via Gmail, we don’t have the luxury of testing different send times.

Tracking our emails with Bananatag

Pitchbox provides you with awesome analytics, specifically related to response rates. It can differentiate between the different replies, such as an out-of-office response versus an actual response back. It also looks at the opportunity age and accounts for the amount of responses over time. Get Response didn’t have analytics on responses, but it did have analytics on opens and clicks, which Pitchbox does not currently have (though it’s a feature they’re adding in the future). Our weekly reporting focused heavily on response rates as well as open rates, so we needed to find a solution that would track the open rate and click rate of our outreach emails.

After researching our options, we discovered the email tracking service Bananatag. With this tool, every email sent through Pitchbox is given a tag that tracks the interaction.

pitchboxgraph.JPG

Individually-tracked emails found in Bananatag

For reporting, I’d simply export all tags and do a VLookup in Excel to compare email lists sent with the tags Bananatag has tracked. From there, I’m able to find the open rate and click rate for each campaign.

The hard numbers speak volumes

It’s clear in this case; the numbers tell the story. When we were using Get Response as our email automation service, our average reply rate was 16.55%. The accept rate of an individual expressing their desire for an article was 5.32%. When we made the switch from Get Response to Pitchbox, our average reply rate increased by over 187% to 47.44%. The accept rate increased as well: it’s at 7.35% and continues to steadily increase over time.

We also saw a positive increase in open rates of the initial outreach email. With Get Response, the average open rate was 49.59%. With Pitchbox, the average open rate is now 54.76%.

Reasons for the overall increase in performance?

It’s safe to say the switch in email automation service was the reason for the overall increase in response rates and accept rates. We hypothesized that the main reason for the overall increase was the legitimacy of the initial email. Because it’s sent through gmail, therefore looks like (and is) a genuine email. There aren’t any weird alignment issues or off-colored backgrounds — just a good, ol’-fashioned email that looks as if I crafted each one individually. The follow-up messages are also another big reason for our increased reply rates. With Pitchbox, we increase our chances of getting a response with the three message we send, unlike the one chance we got with Get Response.

How could the process be improved?

Moving forward, we really want to test different types of messaging, specifically related to the follow-up messaging and the outreach schedule. Currently, the two follow-up messages we use in our campaign are sent out every 4 days. We’d like to test this and see if we should narrow that time from 4 days to 2, or possibly extend the time in between follow-ups from 4 days to 7. Testing our messaging is also vital to improving the process. Are prospects losing interest too quickly because our message is too long? We plan on A/B testing this in the future, using our original message and a shortened version.

In conclusion

When faced with the task of changing our email automation service, we were pleasantly surprised to have not only improved upon the tools we use in our link building process, but ultimately increase our reply rates drastically — by 187%. Have you had your own success with any particular outreach tools? Share your tips in the comments!

Sign up for The Moz Top 10, a semimonthly mailer updating you on the top ten hottest pieces of SEO news, tips, and rad links uncovered by the Moz team. Think of it as your exclusive digest of stuff you don’t have time to hunt down but want to read!

Giving Searchers a Reason to Prefer Your Brand – Whiteboard Friday

Posted by randfish

It’s the season of giving, and that notion extends to search! Brand preferences have an almost tangible impact on several levels, from consumer affinity to a rankings boost on Google. In this holiday edition of our now-traditional Whitebeard Friday, Rand explains why it’s important to keep brand recognition at the forefront of your strategy, and offers up a framework on how to get started on giving searchers a reason to prefer your brand.

http://fast.wistia.net/embed/iframe/2h2tfg1mdc

http://fast.wistia.net/assets/external/E-v1.js

Click on the whiteboard image above to open a high resolution version in a new tab!

Video Transcription

Howdy, Moz fans, and welcome to the special Christmas edition of Whiteboard Friday. Now, whether you celebrate Christmas or not, my family is Jewish, at least ethnically, but we still love Christmas. We used to get a tree and presents and all that kind of stuff. But Merry Christmas to all those of you who celebrate religiously or non-religiously, and to all the rest of you, hopefully you’re having a lovely and wonderful December holiday break time, middle of wintertime. The sun’s going to start getting a little higher in the sky. The days get a little longer. I’m really looking forward to that, especially being here in Seattle.

I want to talk today about giving searchers something, a reason to prefer your brand. This is why it is so critical going forward into the next year, into 2016. We have seen that the last few years have been years where Google, where social media sites, where consumers and customers, web users of all kinds and platforms of all kinds have given brands — especially brands that have recognition, that people have an affinity for — they give them a lot of preference. I’ll show you what I mean.

Even small brand preferences can yield these sort of remarkable and amazing results because of the amplification that they receive all the way down the line in your marketing effort. Let’s say, for example, that you are able to get a slight lift in brand recognition, in brand affinity, in recall, and in positive associations. It’s going to do a few things for you.

Raise CTR in search results

First off, it’ll raise your average click-through rate in search results. As a searcher is performing whatever queries they are, the hopefully many thousands of queries that lead to your site, if you appear in position four, five, or six, you might see a slightly higher click-through rate than what you would normally see for an average website ranking in that position because of the brand preference. What this does, actually, is over time it results in higher rankings because Google is set up to reward a long-term click-through rate bump and all the other signals that come with that into higher ranking

So even if you are someone who says, “Ah, I’m not really sure whether Google’s using click-through rate models in my stuff,” they are in a lot of stuff now. Even if you don’t believe that, what’s happening is you’re getting a slightly higher share of visits, which means a slightly higher share of people who can amplify your brand, link to your brand, all those kinds of things. All of those signals over time slowly, positively increase your potential ranking.

Increase return visits to site

Next up, if you have that slight brand preference, you’re going to increase the rate at which visitors return to your site, come back to you through bookmark, through type-in, through branded search, all of those kinds of things. Those forms of returning visits, whether it is branded search or direct visit or a bookmark, that will lead to browser and search biasing. You can see this in all of your browsers.

If I’m on my iPhone or my Android device, if I’m in Google Chrome on a laptop or desktop, and I start typing something, all of those browsers and all of those systems will look for previous patterns that start to match what I’m typing in or voice searching, and they will be more likely to bias to show me those kinds of things. If I’ve been to Moz in the past and I type just “M” into my Chrome browser, I’m likely to see Moz in that dropdown list of things that it suggests to me, particularly if I visit with some real frequency. So you get that preferential treatment.

But this also goes back to helping your rankings up here because brand-based search queries, as Google has shown, can have an impact on non-branded, unbranded query ranking. If lots of people are searching for let’s say “Virgin America flights to San Francisco,” when Google sees the query of flights to San Francisco, they might say, “Hey, you know what, Virgin America should rank a little bit higher because we’ve seen lots of branded search volume for them.”

Improve conversion likelihood & likelihood for social, press, and WoM Aamplification

Obviously, brand lift can help conversion likelihood which leads to more sales. That’s one of the most direct and obvious ones. That’s one of the reasons that big brand marketers invest so much in it. But it’s also the case they will increase the likelihood, so let’s say that you are reaching out through social media or amplifying messages through social media, through press, obviously through word of mouth which may be somewhat under your control and a lot not in your control, all of that amplification will be slightly enhanced each time with additional brand preference, and that means that in the future you have a larger audience for future marketing, future targeting. It’s hugely helpful there.

Perception of value and quality improves

Also, you can see that perception of value and quality actually improves as brand affinity and recall and recognition goes up. You’ve seen this in lots of consumer tests. One of my favorite examples is the Bing study, where Bing looked at replacing Google’s results with Bing’s results, but they had the Google logo and the Google layout, and then they showed Google’s results in Bing. No matter whose results they showed, if they showed the Google logo next to it, people said those were the better results. So essentially, the brand is part of how we judge the quality of something. It is part of that.

This goes to some consumer-based tests around wine, the flavor that you get from wine or the enjoyment you get from wine. If you set something down and it is a recognized bottle known to be very high in price, known to be hard to get, you will actually see areas of the brain light up and perceive that wine to be better tasting and to provide more enjoyment, even if it’s actually filled with cheap $5.00 wine. This psychological preference is actually improving our perception of quality from the brand perspective, and because of that we get higher retention, more recidivism.

So brand can help you in a huge number of ways, both technical through algorithmic and social means, and also psychological means. Worth investing in absolutely, for the years to come, and certainly as the last few years have pushed more and more stuff in web marketing, it becomes essential for all of us.

But how do we do this? I’m not going to be able to get into all the tactical details today. I mean, we could spend a whole Whiteboard Friday on any one tactic in these groups, but I wanted to provide some framework around these groups for you to think about and add potentially to your strategy going into the new year.

Brand values

Things like brand values matching customer values or overlapping with them, or working against them, can impact how a brand is perceived. Most obviously, many consumers are very frustrated with brands like Volkswagen or Enron before that, who we feel like they’ve pulled the wool over our eyes and they’ve been dishonest. Cigarette marketing in the tobacco industry turned off many, many consumers in the western world to a lot of those brands. Then brands that have values that we recognize and respond to, we can see those getting brand lift.

Voice, tone, and visuals

Voice, tone and visuals, this is essentially the style of how you present yourself and whether that matches and has resonance with your audience’s preferences, with their own styles, and with existing cultural cues. So you can see that it’s like speaking the language of your customer, but we’re not talking about a verbal language like English versus Hindi versus Spanish versus German. We’re talking about the resonance on the cultural language level. Are we in the same cultural zeitgeist? Do we have the same cues and recognition? Do we have the same things around nostalgia and associations between concepts, all those kinds of things?

Content

Content, this is one that we talk about a lot, matching your content to your audience’s potential needs, their desires, things they enjoy, their influencers and what their influencers are going to amplify. This is really where content strategy comes into play, because if you take content down to the tactical level only, you are not thinking about the overlap. Well, many times when you’re doing tactical content creation and content amplification, you’re not thinking about the strategic overlap with what’s my audience’s needs, what do they desire, what do they have associations with, what do they enjoy, what do their influencers enjoy, all of that kind of stuff. When you do this, you get closer and closer to making that Venn diagram match, and your content is much more likely to have a strategic, positive impact on brand association.

Brand representatives

Brand representatives, the human beings that we associate with a brand are critically important. In fact, I would say, and many, many marketers have been talking about this for the last couple of years, but more important to a brand’s presence than ever before. We are getting to build brand associations through human associations. Oftentimes that’s founders and CEOs, but many times it is also brand representatives, which can include a large number of people. It can include people who are amplifiers of that brand, not necessarily people who work at the brand, but amplifiers. It can include the testimonials that are present in the marketing messages. It can include brand contributors, whether those are guest contributors or full-time, and of course team members. The big one is often founders and CEOs and sort of the leaders of an organization, but many of these others have influence as well. If those match well to who your customers’ influencers are or the zeitgeist of your customers’ world, that can create additional brand resonance as well.

Pricing and positioning

Pricing and positioning, this is sort of the classic, old-school four P’s of marketing, but the value perceived and the value that is quantifiable against the pricing and the cost associated with the service. Costs, I don’t just mean financial cost, but also setup cost and work-wise and process cost and customers’ own self-perception, meaning that if a customer believes that they are a medium-sized business but you’re selling them a package that’s called enterprise, they may perceive that they’re paying too much. They don’t think of themselves as an enterprise. Even though the enterprise package is right for them and it’s providing the right kind of value, you’re now sort of disconnecting the language of the positioning from what the customer actually thinks of themselves as. That can potentially harm brand affinity.

Psychological nudges

Then, of course, lots and lots of psychological nudges that build associations around a brand. So these are things like familiarity, liking, processing fluency, which we’ve had a whole Whiteboard Friday on processing fluency, I think last year in 2014. Those kinds of things, when I say “processing fluency,” what I’m talking about is the ease with which I recognize something and can make an association. For example, one of my favorite studies around this was the correlation between stock prices of companies that have easily pronounceable names versus hard-to-pronounce names, and you can see that the easier processing fluency of an easier-to-pronounce name over time tends to correlate with higher stock value. Weird. Seems like markets would be more sophisticated than that, but human beings are subject to this stuff. User experience flow, that also fits into the psychological nudges.

As we’re thinking about influencing all this stuff, a lot of times when people talk about brand and building brand, they talk exclusively about brand advertising. But as you can see from all of these categories there’s a lot of organic work that we can do in SEO, in social, in content, in email, in community, in all the channels that we talk about here at Moz that can have a big influence on your brand, and that can have a big influence over time on all of these things positively as well.

All right, everyone. Merry Christmas. If you are celebrating another holiday, may you have a great holiday, and we’ll see you again next week for another edition of Whiteboard Friday. Take care.

Video transcription by Speechpad.com

Sign up for The Moz Top 10, a semimonthly mailer updating you on the top ten hottest pieces of SEO news, tips, and rad links uncovered by the Moz team. Think of it as your exclusive digest of stuff you don’t have time to hunt down but want to read!

How to Add a Shortcodes User Interface in WordPress with Shortcake

If you are developing a WordPress site for a client, then it’s likely that you will have shortcodes for your clients to use. The problem is that many beginners don’t know how to add shortcodes and if there are complex parameters involved, then it’s even more difficult. Shortcake provides a solution by adding a user interface for shortcodes. In this article, we will show you how to add a user interface for shortcodes in WordPress with Shortcake.

What is Shortcake?

WordPress offers an easier way to add executeable code inside posts and pages by using shortcodes. Many WordPress themes and plugins allow users to add additional functionality using shortcodes. However, sometimes these shortcodes can become complicated when a user needs to enter parameters for customization.

For example, in a typical WordPress theme if there is a shortcode to enter a button, then the user will probably need to add atleast two to five parameters. Like this:

[themebutton url=”http://example.com&#8221; title=”Download Now” color=”purple” target=”newwindow”]

Shortcake is a WordPress plugin and a proposed future WordPress feature. It aims to solve this problem by providing a user interface to enter these values. This will make shortcodes a lot easier to use.

Shortcake Bakery Plugin

Getting Started

This tutorial is aimed for users who are new to WordPress development. Beginner level users who like to tweak their WordPress themes would also find this tutorial helpful.

Having said that, let’s get started.

First thing you need to do is install and activate the Shortcake (Shortcode UI) plugin.

You will now need a shortcode that accepts a few parameters of user input. If you need a little refresher, here is how to add a shortcode in WordPress.

For the sake of this tutorial we will be using a simple shortcode that allows users to insert a button into their WordPress posts or pages. Here is the sample code for our shortcode, and you can use this by adding it to your theme’s functions file or in a site-specific plugin.

 add_shortcode( 'cta-button', 'cta_button_shortcode' ); function cta_button_shortcode( $atts ) { extract( shortcode_atts( array( 'title' => 'Title', 'url' => '' ), $atts )); return '<span class="cta-button"><a href="' . $url . '">' . $title . '</a></span>'; } 

You will also need to add some CSS to style your button. You can use this CSS in your theme’s stylesheet.

 .cta-button { padding: 10px; font-size: 18px; border: 1px solid #FFF; border-radius: 7px; color: #FFF; background-color: #50A7EC; } 

This is how a user will use the shortcode in their posts and pages:

[cta-button title="Download Now" url="http://example.com"]

Now that we have a shortcode that accepts parameters, let’s create a UI for it.

Registering Your Shortcode User Interface with Shortcake

Shortcake API allows you to register your shortcode’s user interface. You will need to describe what attributes your shortcode accepts, input field types, and which post types will show the shortcode UI.

Here is a sample code snippet we will use to register our shortcode’s UI. We have tried to explain each step with inline comments. You can paste this in your theme’s functions file or in a site-specific plugin.

 shortcode_ui_register_for_shortcode( /** Your shortcode handle */ 'cta-button', /** Your Shortcode label and icon */ array( /** Label for your shortcode user interface. This part is required. */ 'label' => 'Add Button', /** Icon or an image attachment for shortcode. Optional. src or dashicons-$icon. */ 'listItemImage' => 'dashicons-lightbulb', /** Shortcode Attributes */ 'attrs' => array( /** * Each attribute that accepts user input will have its own array defined like this * Our shortcode accepts two parameters or attributes, title and URL * Lets first define the UI for title field. */ array( /** This label will appear in user interface */ 'label' => 'Title', /** This is the actual attr used in the code used for shortcode */ 'attr' => 'title', /** Define input type. Supported types are text, checkbox, textarea, radio, select, email, url, number, and date. */ 'type' => 'text', /** Add a helpful description for users 'description' => 'Please enter the button text', ), /** Now we will define UI for the URL field */ array( 'label' => 'URL', 'attr' => 'url', 'type' => 'text', 'description' => 'Full URL', ), ), ), /** You can select which post types will show shortcode UI */ 'post_type' => array( 'post', 'page' ), ) ); 

That’s all, you can now see the shortcode user interface in action by editing a post. Simply click on the Add Media button above a post editor. This will bring up the media uploader where you will notice a new item ‘Insert Post Element’ in the left hand column. Clicking on it will show you a button to insert your code.

Inserting your shortcode in a post or page

Clicking on the thumbnail containing the lightbulb icon and your shortcake label will show you the shortcode UI.

User interface for a simple shortcode

Adding Shortcode With Multiple Inputs

In the first example, we used a very basic shortcode. Now lets make it a little more complicated and a lot more useful. Let’s add a shortcode that allows users to choose a button color.

First we will add the shortcode. It is nearly the same shortcode, except that it now excepts user input for color.

 add_shortcode( 'mybutton', 'my_button_shortcode' ); function my_button_shortcode( $atts ) { extract( shortcode_atts( array( 'color' => 'blue', 'title' => 'Title', 'url' => '' ), $atts )); return '<span class="mybutton ' . $color . '-button"><a href="' . $url . '">' . $title . '</a></span>'; } 

Since our shortcode will be showing buttons in different colors so we will need to update our CSS too. You can use this CSS in your theme’s stylesheet.

 .mybutton { padding: 10px; font-size: 18px; border: 1px solid #FFF; border-radius: 7px; color: #FFF; } .blue-button { background-color: #50A7EC; } .orange-button { background-color:#FF7B00; } .green-button { background-color:#29B577; } 

This is how the buttons will look like:

Call to action buttons created with shortcode

Now that our shortcode is ready, the next step is to register shortcode UI. We will be using essentially the same code, except that this time we have another parameter for color and we are offering users to select from blue, orange, or green buttons.

 shortcode_ui_register_for_shortcode( /** Your shortcode handle */ 'mybutton', /** Your Shortcode label and icon */ array( /** Label for your shortcode user interface. This part is required. */ 'label' => 'Add a colorful button', /** Icon or an image attachment for shortcode. Optional. src or dashicons-$icon. */ 'listItemImage' => 'dashicons-flag', /** Shortcode Attributes */ 'attrs' => array( /** * Each attribute that accepts user input will have its own array defined like this * Our shortcode accepts two parameters or attributes, title and URL * Lets first define the UI for title field. */ array( /** This label will appear in user interface */ 'label' => 'Title', /** This is the actual attr used in the code used for shortcode */ 'attr' => 'title', /** Define input type. Supported types are text, checkbox, textarea, radio, select, email, url, number, and date. */ 'type' => 'text', /** Add a helpful description for users */ 'description' => 'Please enter the button text', ), /** Now we will define UI for the URL field */ array( 'label' => 'URL', 'attr' => 'url', 'type' => 'text', 'description' => 'Full URL', ), /** Finally we will define the UI for Color Selection */ array( 'label' => 'Color', 'attr' => 'color', /** We will use select field instead of text */ 'type' => 'select', 'options' => array( 'blue' => 'Blue', 'orange' => 'Orange', 'green' => 'Green', ), ), ), /** You can select which post types will show shortcode UI */ 'post_type' => array( 'post', 'page' ), ) ); 

That’s all, you can now edit a post or page and click on the Add Media button. You will notice your newly added shortcode under ‘Insert Post Elements’.

Selecting post element or shortcode to insert

Clicking on your newly created shortcode will bring up the shortcode UI, where you can simply enter the values.

Shortcode UI with a select field

You can download the code used in this tutorial as a plugin.

wpb-shortcake-tutorial

We have included the CSS, so you can use it to study or use it to add your own call to action buttons in WordPress using an easier user interface. Feel free to modify the source and play with it.

We hope this article helped you learn how to add a user interface for shortcodes in WordPress with Shortcake. You may also want to take a look at these 7 essential tips for using shortcodes in WordPress.

If you liked this article, then please subscribe to our YouTube Channel for WordPress video tutorials. You can also find us on Twitter and Facebook.

The post How to Add a Shortcodes User Interface in WordPress with Shortcake appeared first on WPBeginner.

How to Add Feature Boxes With Icons in WordPress

Do you want to add a feature box with beautiful icons on the homepage of your WordPress site? These feature boxes show important selling points of your products and services. It has proven to be a highly engaging technique in presenting features to new customers. In this article, we will show you how to easily add feature boxes with icons in your WordPress site.

Adding feature boxes in WordPress with icons

What is Feature Boxes With Icons?

Most people when they visit websites don’t actually read them. As humans, we’re becoming professional scanners.

This means that as a business owner, you need to present important information in an easily scannable and highly engaging format.

That’s why most popular business websites usually have a large image or a slider on top with a call to action button.

Just below that, you can use a features box which allows you to showcase the important features of your product or service. Each feature box can have its own call to action which can lead users to learn more.

Here’s an example from our OptinMonster website:

Example of feature boxes on the homepage of a WordPress powered website

Adding Feature Boxes with Icons on Your WordPress Homepage

First thing you need to do is install and activate the Advanced WP Columns plugin. Upon activation you need to visit Settings » Advanced WP Columns to configure the plugin.

Simply scroll down to the option ‘Column class’ and enter mycolumns next to it. Don’t forget to click on the save changes button to store your settings.

Adding CSS class for your columns

Next, you will need a plugin to insert beautiful SVG icons into your feature boxes. Install and activate WP SVG Icons plugin.

You are now ready to create your feature boxes.

Start by editing the page where you want to add the feature boxes.

You will notice two new buttons on the post editor screen. The first one is the Add Icon button located just above the editor. The second button is located as the last item in the visual editor menu.

If your visual editor is only showing one row of buttons, then you need to click on the toggle toolbar button to expand it.

Advanced columns and svg icon buttons in post editor

First, you need to click on the Advanced WP Columns button. This will bring up a popup where you need to click on Empty and then select the number of columns you want to add.

Creating feature boxes columns

After that you need to click on each column to add some text. If you don’t add some text now, then it will be difficult to see the columns in post editor. Once you are done click on the add columns button at the bottom.

You will see the columns in your post editor now. The next step is to add icons above the text.

Take your mouse to the beginning of the text area in the first column and click on the enter button. This will move the text down and give space to insert your icons.

Now you need to click on the Add icon button, which will bring up a nice popup like this:

Adding icons to feature boxes in WordPress

From there, you can select the icon you want to use by clicking on it. Next, you need to click on the span button, so your icon is wrapped inside <span> element.

Finally, click on the insert button. You will now see the shortcode for the SVG icon in your post editor. Depending on the name of the icon you selected, it will look something like this:

[wp-svg-icons icon="rocket" wrap="span"]

Repeat the process to add icons in other feature boxes as well.

Once you are finished, simply click on the Update button to save your page.

You are nearly done, but if you preview your page, then you will notice that icons are too small and your feature boxes are barely noticeable.

Feature boxes with small icons and no styling

You will need to add a little CSS to solve this problem. Simply add this CSS snippet into your theme or child theme‘s stylesheet.

 span.wp-svg-rocket.rocket { font-size:100px; } span.wp-svg-cloud.cloud { font-size:100px; } span.wp-svg-headphones.headphones { font-size:100px; } .mycolumns { border:1px solid #eee; min-height:250px; padding-top:20px !important; } 

Don’t forget to adjust the CSS to match the names of the icons you are using.

feature boxes with proper styling and large icons

We hope this article helped you add a beautiful features boxes section on your homepage. You may also want to see our guide on 5 best drag and drop WordPress page builders because a lot of those page builders have this feature box functionality built into them.

If you liked this article, then please subscribe to our YouTube Channel for WordPress video tutorials. You can also find us on Twitter and Facebook.

The post How to Add Feature Boxes With Icons in WordPress appeared first on WPBeginner.